Review: WP Engine (Improved My Site Speed by 58%! Amazing!)
When I started ReviewingThis.com back in February 2016, I was looking to have this site serve as a medium for my personal opinions and reviews on various products that I use. As the months passed, the website’s popularity and following has been continually improving but what continued to decline was my speed performance.
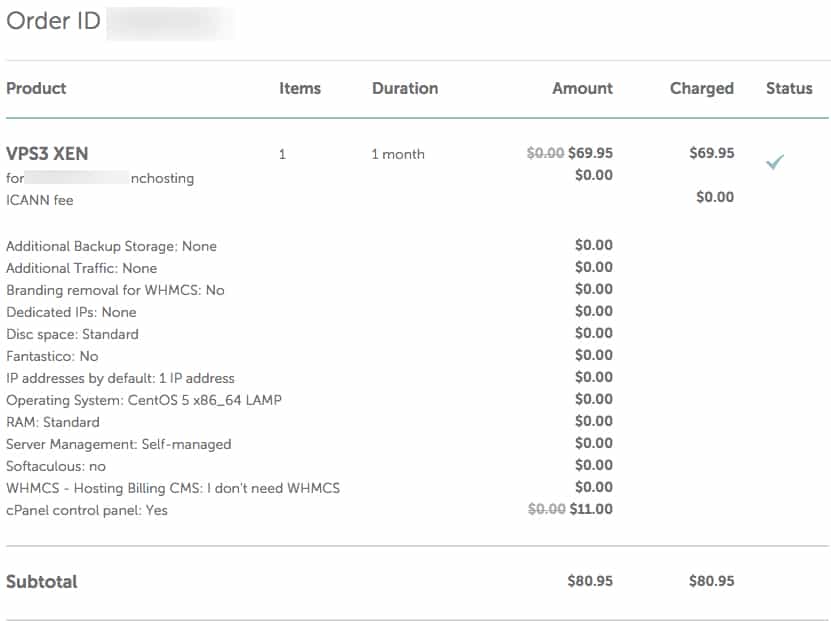
Initially, when I was selecting a hosting package for the website, I settled with the VPS 1 – Xen package from NameCheap. During that time, I felt that the VPS1 server by NameCheap will be sufficient for the site’s size and traffic activity. With time, I continued to add more and more content to the website, and most of all, utilizing many images and media files. Once the site had about ten different reviews up, I decided to pay attention to the load speeds. Well…I was alarmed when I realized that on average, my website completely rendered at between 5-6 seconds. In other words, awfully poor.
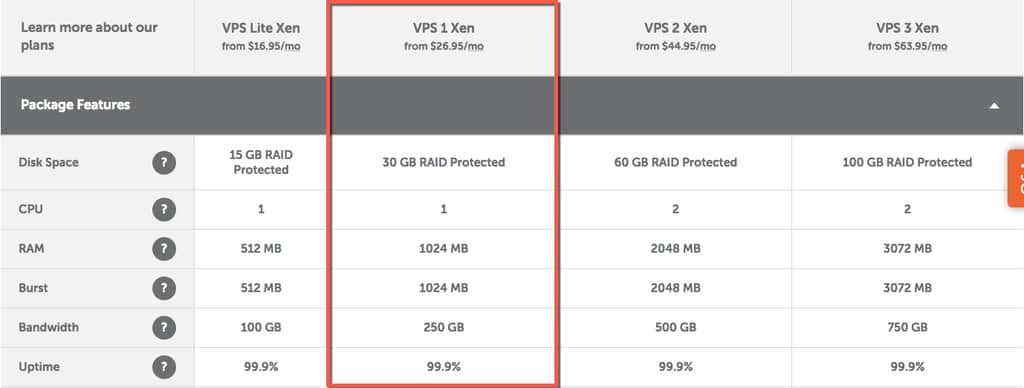
So what did I do? I decided to upgrade the sever I was completely using and I contacted NameCheap. I was suggested to upgrade to their VPS3 server for better performance. The VPS3 server was costing me $80.95, so quite the upgrade in cost compared to the prior server, but was it an improvement?
Somewhat. Further tests showed that my website was loading between 3.5-4.0 seconds, but that was still not enough. Nearly all the traffic that comes to ReviewingThis.com is organic, aka people making a google search and landing on my website. Well, page speed is a very important factor when it comes to where you rank on Google. Here is a statement from Google mentioning how important page speed. I also want to point that a slow website will have a higher bounce rate, and Google uses your bounce rate to also determine your ranking.
Anyhow, with more and more content being posted on ReviewingThis.com and my site speed not improving from high 3’s, I decided it’s time to migrate to a competent server. Initially I had thoughts of going with a dedicated server, but I felt that might be an overkill at the moment. After spending a bit of time Google’ing different solutions, I settled with going with a managed WordPress hosting.
Here is the list of companies that I narrowed it down to in regards to managed WordPress hosting:
- WP Engine
- SiteGround
- DreamHost
- Pressable
Ultimately, I decidedon WP Engine. I spent some time reading reviews for several companies, and I simply felt that WP Engine was the right choice for me. In addition to the reviews, I also loved the fact that they have MaxCDN integrated with their service, they support a free SSL certificate via Let’s Encrypt, very easily migration and lastly, they perform daily backups of your website! I’ll talk about the benefits of MaxCDN in a bit.
Moving forward, these were the plan options at WP Engine:
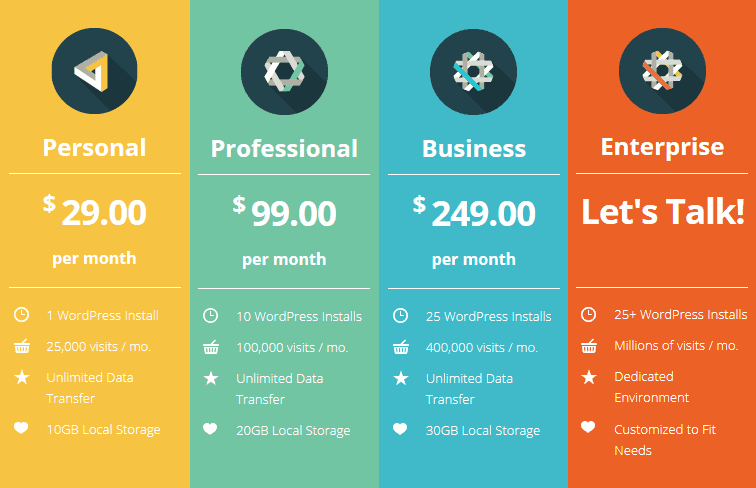
I settled with their smallest plan which is good for 1 WP install, and allows for 25,000 visits per month. Yes, when you use a managed hosting, you should expect to have limitation on your traffic. If let’s say I order their smallest package and I end up with 30,000 visitors for the month, then I will have to pay extra for the overages. At the moment, ReviewingThis.com attracts 150-200 visitors per day, so a plan that supports 25,000 visitors per month is more than enough.
By the way, if you CLICK HERE, you’ll get 20% off on your first month with WP Engine. So if you’re looking to sign up as well, make sure you save a bit of money.
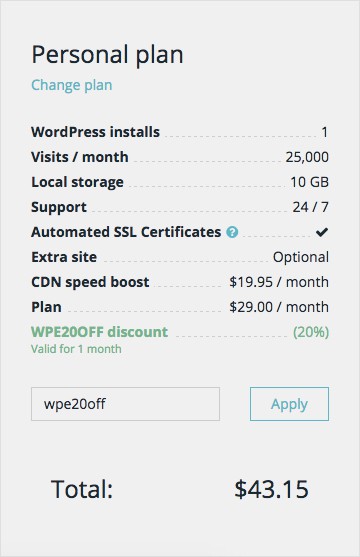 The image is the total charge before I entered my credit card information. You’ll notice that I selected the “CDN speed boost” for an additional $19.99/month. Now keep in mind, WP Engine uses MaxCDN for this service. I also cross referenced the price from MaxCDN’s website to that on WPEngine’s website, and in both cases, it’s $19.99/month.
CDN stands for ‘Content Delivery Network’. For my non-technical readers, CDN is not necessary on all websites. If you have a small website that doesn’t rely on many images or videos, then a CDN will provide little benefit. Allow me to explain through example. Let’s say you have hosting with HostGator and their server is located in California. If a visitor from New York visits your website, the connection attempt will be sent all the way to your server in California, and then all the information on the server needs to be sent from California to New York. All this takes time, especially if your page is utilizing many videos and images. Now, if you have a CDN, the servers in the CDN are responsible for delivering your website content and there are many locations. Instead of there only being 1 location in the US from where your content is being pulled from, with a CDN, your content can be pulled from one of the 20 different locations. So going back to our example, if you have a CDN, then that visitor from New York may send a ping to your CDN, and the CDN may have a server in New Jersey, and deliver your site information from NJ, as opposed to CA. But let me stress this again, if your website is nearly all text, then a CDN isn’t worth the price.
Moving on, my recurring payment from now on is $48.95 vs the $80.00 I was paying NameCheap. Granted, on NC I was able to host as many websites as I wanted on the server, but all that is quite useless when even a single site on the server couldn’t perform optimally.
Once I paid the invoice, I had to wait about 5 minutes to receive my welcome email and instructions to move forward. During this wait period, I decided to test my site speed once again, so I know where I stand beforehand. I ran the site speed site on Pingdom:
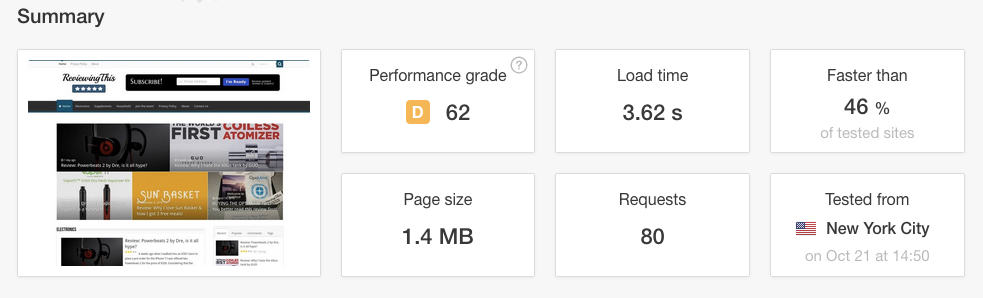
3.62 seconds.
It literally took my website longer to load than for a 2007 Lamborghini Gallardo to go from 0-60 mph.
Step 1
I logged into my WP Engine ‘User Portal’ and had to find the “Domains” tab. You may find it in the following screenshot:
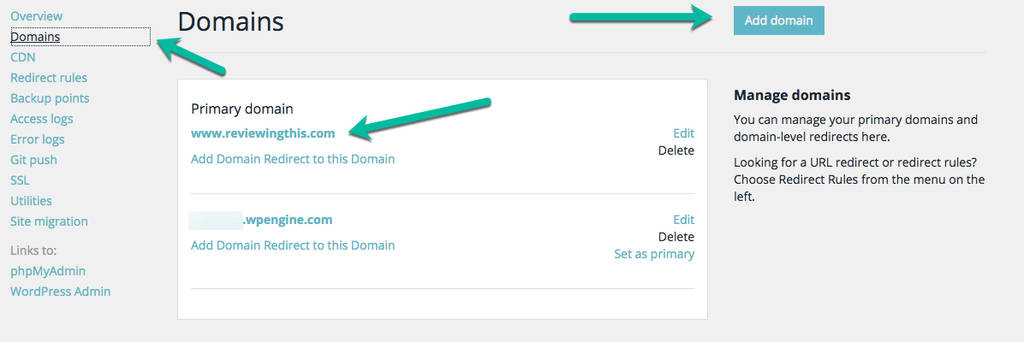
When you first open this page. You’ll notice one domain there already, it will be: yourusername.wpengine.com. You’ll notice that in the image I blurred out the username that I used, but that is where your username would be. What you want to do is click on ‘Add Domain’, and simply add your actual website domain. You will then see an option on the right side of the domain to “Set as primary”.
Step 2
Time for the migration! First off, you need to download the Plugin suggested and built by WP Engine. You can find the plugin at the following URL, or you can just do a search for its name via your WP dashboard.
Now you want to click on “Site Migration” on the left menu of your WP Engine portal. Once the page loads, you’ll information similar to this:

You’ll now open up the “WP Engine Migration” plugin from inside your WordPress admin, and enter the above information into the following fields:
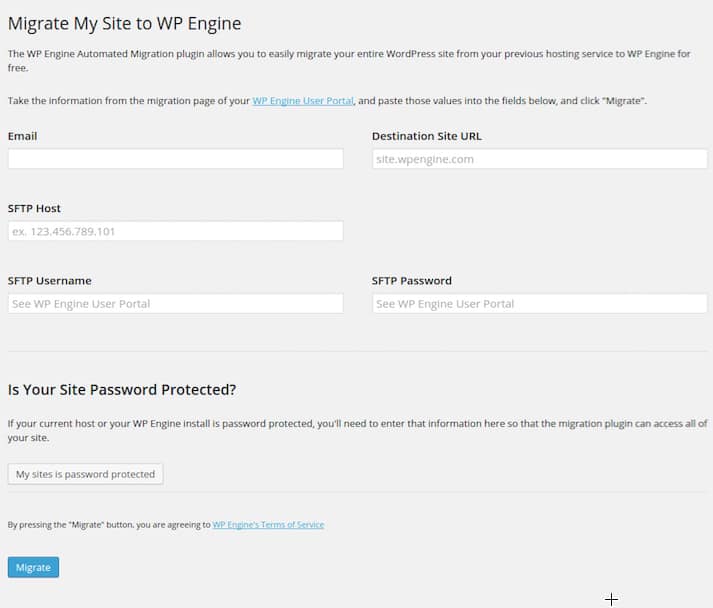
Make sure that the email you enter in the field is the same email address you used when signing up with WP Engine. For the destination URL, you will first need to migrate your site over to yourusername.wpengine.com. The reason why we do this is to make sure that the plugin pulls all the content successfully. Use the SFTP host information, SFTP username that you are given in the WP Engine portal, and copy over the password that you generated. All you have to do now is click “Migrate”.
Migrating your website will take some time depending on the size of your website. For large websites, you can expect to even wait a few hours. For a site the size of ReviewingThis.com, it only took about 15 minutes for it to migrate completely.
Keep in mind, clicking on ‘migrate’ will not jeopardize any of your website content or files.
Step 3
At this point, you should have gotten a message saying that the migration is complete. What you want to do now is go to yourusername.wpengine.com and review everything that was migrated. If everything worked perfectly, then it should be a perfect copy of your current website.
If you reviewed the copy, and everything migrated perfectly, you will want to visit your migration plugin once again, re-enter all the information, but this time, for ‘destination URL’, you want to use your actual website URL. In my case, I used www.reviewingthis.com.
Click on ‘Migrate’, and wait again.
Step 4
Now that we have our content migrated to our actual domain, we need to point out DNS properly. What we need to do is create a record for the domain. So log into the registrar that you used to buy the domain. Every single domain registrar has a support section that provides information on how to create new records, overall, it’s not a difficult process.
Once you’ve found the page with your registrar where you can create records, you will want to create a new record.
Here is how it looks on NameCheap:

For ‘Type’, you want ‘CNAME Record’ selected. For the ‘Host’, you want to type in ‘www’. Lastly, for the value, you’ll write in yourusername.wpengine.com.
Save the record now.
You’re done.
Once the record was saved and I waited about 10 minutes, I was honestly excited to test the speed of my website again. So I went back over to Pingdom, and I ran a test, this was the result:
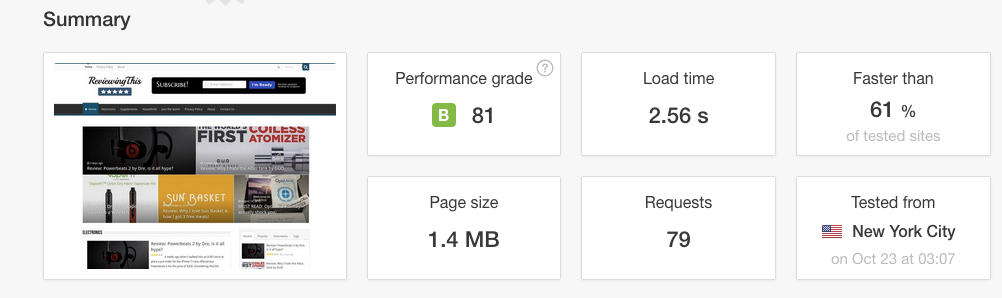
Just like that, we went from a 3.62 second load time, to a 2.56 second load time!
But, we weren’t done yet. Since I did pay for the CDN, it was time to activate it. So I went back into my WP Engine Portal, and clicked on CDN from the menu:
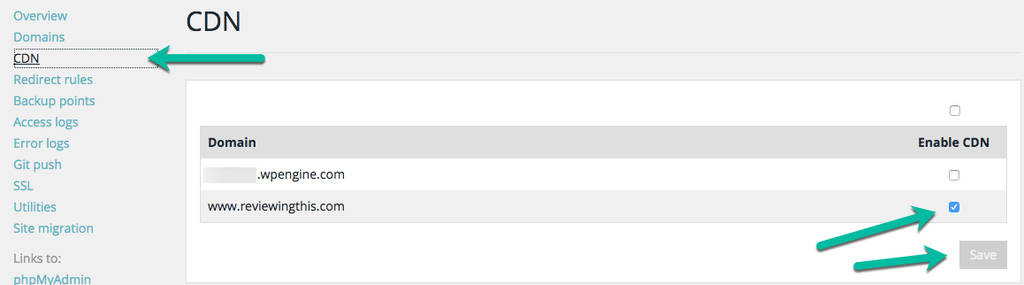
All I had to do was select my actual domain, and click on ‘Save’. Now, CDN was active on my domain. It was astonishingly that easy, but I guess those are the perks of using a managed wordpress hosting.
What is it time now for? Another speed check:
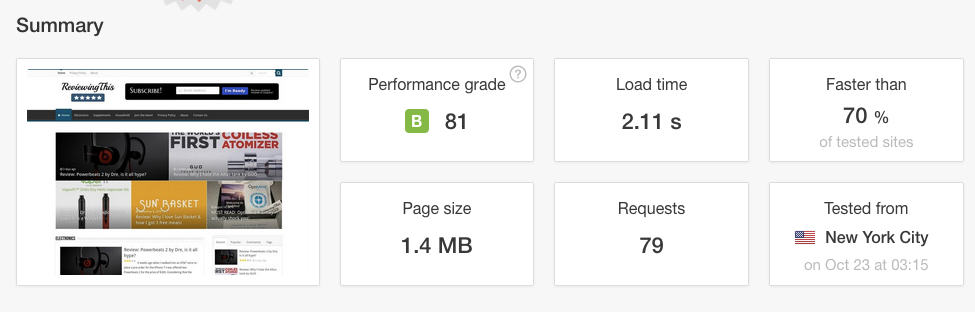
So let’s just summarize this here. We started off with a 3.62 load time with NameCheap. Then we lowered it to 2.56 with WP Engine, and finally, we dropped it down to 2.11 with CDN enabled.
Simply amazing.
If you’ve been paying attention, I’ve been pinging the website from New York City. Well what happens if we ping it from California?
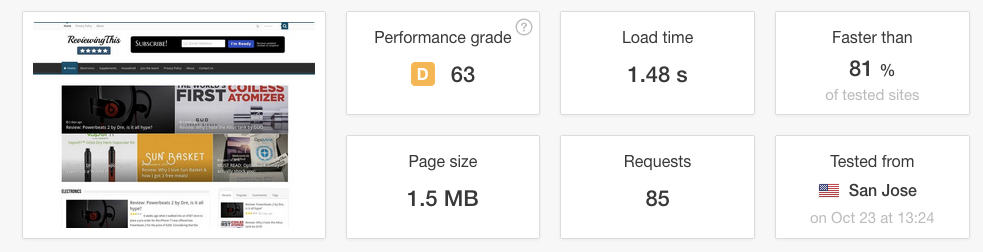
Even better…
How about this, what if we ping it from Sweden?
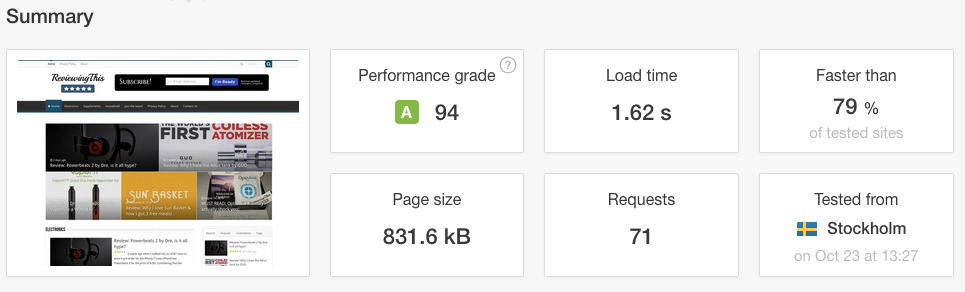
There you have it folks. With the utilization of WP Engine and CDN, my website went from loading in the high 3’s, to loading in the low 2’s and better!
Overall, WP Engine has impressed me, and they’ve definitely earned themselves a long term customer. With that being said, I do want to mention that WP Engine is not the right solution for everyone. As a matter of fact, not just WP Engine, but any WordPress Managed Hosting. If you’re website pulls in hundreds of thousands of visitors monthly, then forget about using any managed hosting unless you like to overspend severely.
WP Engine’s ‘Business’ plan allows for 400,000 monthly visitors at a price of $249/mo. For that money, you can get yourself a serious dedicated server that would be able to handle such a load, and also perform well. I don’t have the price quotes for their ‘Premium’ or ‘Enterprise Grade’ packages, which allow for even more visitors, but you will obviously also pay quite handsomely for them. At the end of the day, WP Engine or any managed hosting is not worth it if you have a very large website.
As it stands right now, these sort of solutions are perfect for small to medium sized websites, but once you cross over 100,000 monthly visitors, you may want to re-consider your options.
I hope you’ve enjoyed my review of WP Engine, and are now better suited to make a decision on whether or not it’s the right solution for you. Hopefully the step by step demonstration I provided will also help any new WP Engine users. In addition, if you’re looking for further tips to optimize your WordPress site, WP Engine has a fantastic free ebook with many great tips. If you have any further questions, feel free to leave a comment I’ll do my best to help you answer them.
I want the 20% off WP Engine coupon please.
Edit: October 24, 2016
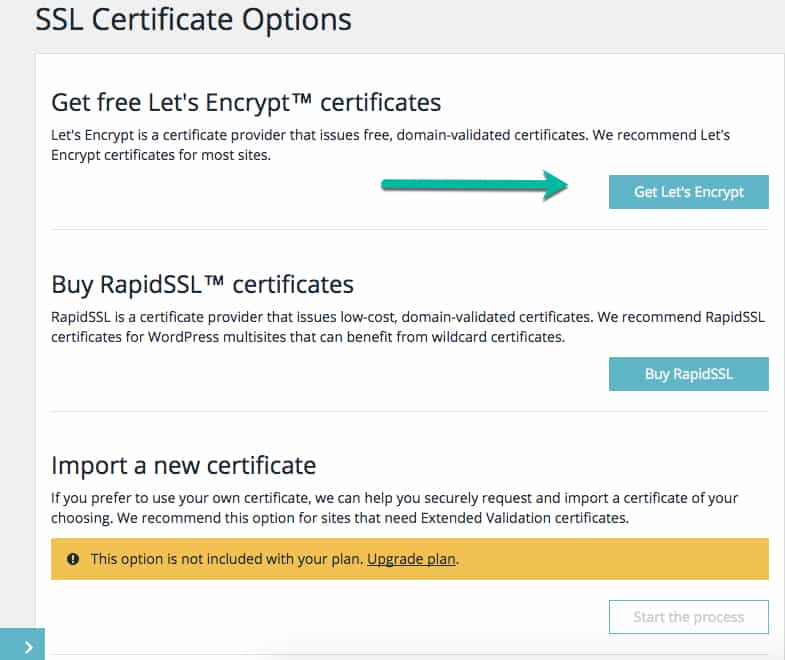
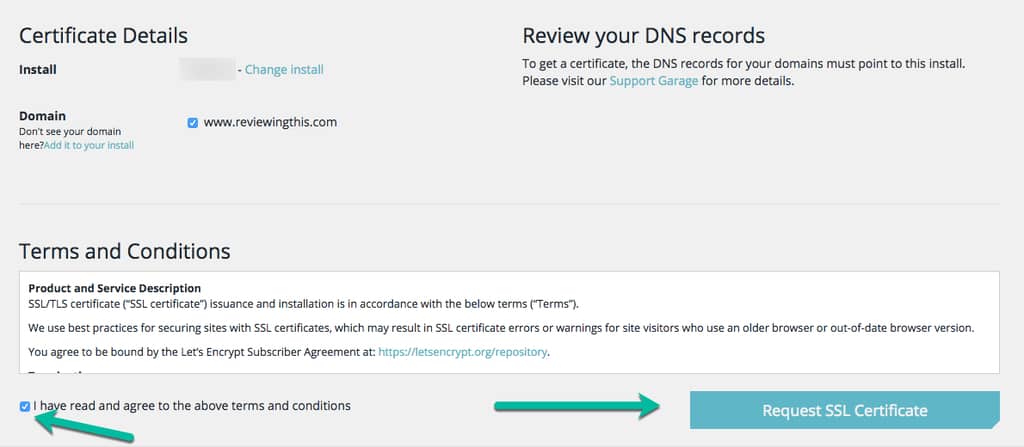
You’ll notice that at the beginning of this article, I mentioned that WP Engine supports a free SSL that is issued by Let’s Encrypt. Well, I decided that I might as well utilize the free SSL which provides domain validation especially since Google has made comments that SSL is a ranking factor. Granted, they admit that it’s not a big ranking signal, but the value is still there. So with this information, I decided to take it upon myself to enable SSL on ReviewingThis.com. The slide slow below depicts the process I took within WP Engine to enable my free SSL:

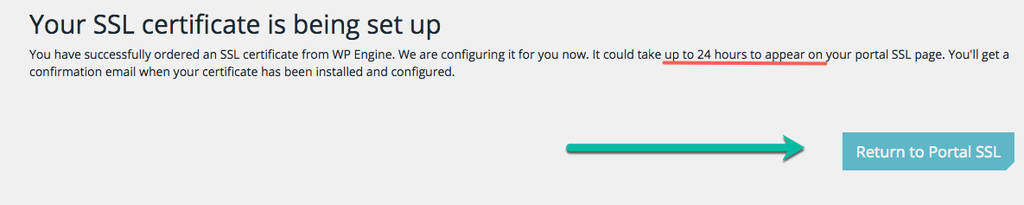
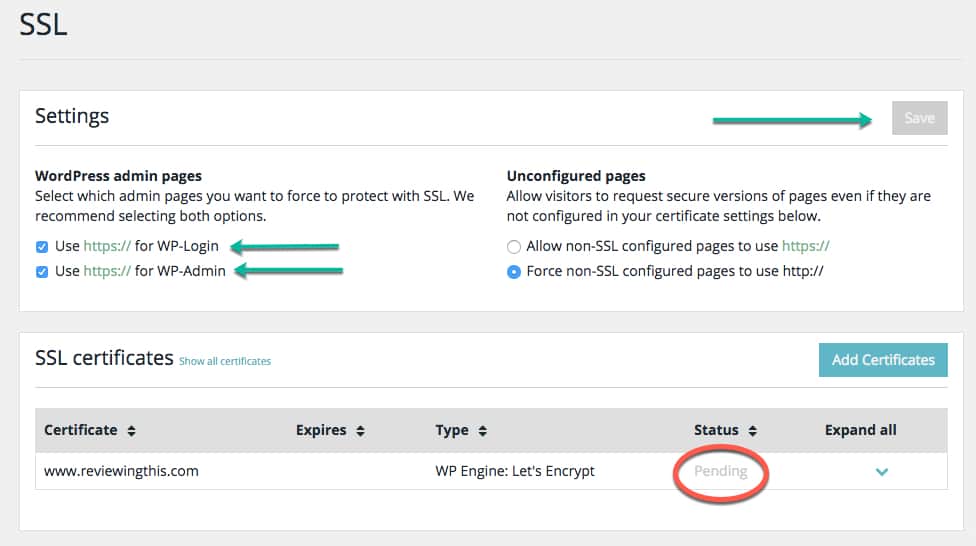
That’s all it took.
Let me be the first to say that unless you’re capturing information from your visitors, then SSL is not necessary. If the only thing you’re doing is collecting email addresses, then you are O.K in simply using a non-secured version of your website. But, the moment you are collecting names, addresses and credit card information, then SSL is a necessity. Nevertheless, if you’re signing up to WP Engine, nothing is stopping you from utilizing the free SSL you’re given. It helps with your search rankings and you earn a lock symbol next to your URL address in the browser.

Edit: October 25, 2016
I’ve taken it upon myself to enable Cloud Flare on my domain, and the results are pretty unbelievable. I figured instead of making this post any longer, I’ll write an individual post for Cloud Flare, just click here to read about it. Here is a spoiler, my site speed is now under 1 second….
Disclosure: We are a professional review website, and on this page you will find affiliate links for which we are compensated for.


